How to Create an Online Course in Simple Steps With Udemy
A comprehensive and complete guide to creating your first online course

Photo by Nick Morrison on Unsplash
Do you want to create an extra source of income? A passive source? Do you have extra time available to create something that requires quite some effort now but will continue to pay you for months or years on end if you do it right?
Then you might consider developing an online course. With everyone being trapped inside their homes, people are upgrading their skillset. It’s time to jump in. If not for the high demand for online courses right now, know that people will never stop learning. It’s no wonder that websites such as Udemy and Coursera have been on the rise for years.
About six years ago, a friend of mine was waiting for me to join him in Australia to travel around. What was supposed to be a six-month trip turned into a six week trip for me because I got an opportunity to start a business. He decided to go ahead anyway and lived in Melbourne for a couple of months until we met up. He read about people developing courses online that can provide its makers with passive income.
My friend developed a course about value investing. He was one of the first and his course has thousands of 5-star ratings. Even to this day, he’s still earning a minimum wage salary from it. Every month!
I won’t promise you mountains of gold and perhaps my friend is more the exception to the rule. Especially in the now overcrowded world of online courses. Still, there is money to be made and if you can teach something that’s valuable to someone else it’s still worth it. Even if there are dozens of courses already covering your expertise. You have something different to offer from your experience and journey.
About a year ago, I wrote a series of articles about how to write a short story. The response was overwhelming so I decided to add more material and turn it into a book. The articles ranked high in Google, so I placed a link to the book in them and it became an Amazon bestseller in the writing category! So that got me thinking about my friends’ story. I could turn this into a course too.
Do not be mistaken, it takes a lot of time if you want to develop a quality course. You have to come up with the course material, assignments, quizzes, and then you have to record it, edit it, mix it, upload it and promote it. It was a slow process for me because I lacked the time. But since we’ve been in lockdown I finished it within two weeks. Every day I take some steps to promote it, and it’s slowly taking off.
So, how can you turn your knowledge into a valuable course that sells? This post contains simple steps to develop your course from start to finish. I based this article on my own experience, but also of that of my friend who made over 6 figures from one 4-hour course.
What can you teach?
What subjects do you know a lot about? What have you accomplished that others try to emulate? If people ask your advice, what’s it usually about? What do people come to you for? What are you excited about and have you studied in depth?
In your life, you learn a lot. Perhaps you keep bees and you can teach people how to do that as well. Or you can put your degree in psychology to good use and develop a course to decrease anxiety.
Take some time to think about what you’re good at. What you’ve learned over the years. What can you offer the world?
Research what people want to learn
If you have one or more ideas for a potential course, the next best step is to see what people want to learn about that subject. This step will provide you with many insights.
To illustrate all the steps in this article, let’s use my quest as an example: short story writing.
Doing research will teach you a couple of things:
Is there any demand for your topic?
What do other teachers teach in their courses?
What’s missing in your opinion?
What do people search for concerning your subject (i.e. what do people want to learn)?
Is it worth investing your time in such a course?
What sub-topics are worth including in your course?
Look at online course platforms
Look on Udemy (or Coursera or any other online course platform) to see what’s offered in your field. What’s missing? What can you contribute? But also, what do other teachers offer and teach. Write it all down.

These are the top 3 courses in short story writing (yay, mine is considered “hot & new”). Click on the top 3 and study the curriculum, course landing page, take it all in and make notes.
Udemy also offers Marketplace Insights. This option will tell you if developing a course is a feasible strategy in terms of demand, estimated monthly income, and competition.

Udemy is loud and clear in this respect, “Bring you’re ‘A’ game to succeed in this topic”. The insights page will also show the most important keywords for your subject, as well as search trends and info. This is very valuable!
Turn to Google
What do people search for in terms of your topic? Read a couple of webpages that pop up after your search query. Study the “people also ask” section. What queries are related to your search? What sub-topics can you deduce from a Google search? Try different keywords and literally type in questions around your subject. Now you can make a list of subtopics people actually search for. Include all popular topics you come across.


Turn to Quora
Search for your topic on Quora. What questions do people ask here related to your topic? Which are the most popular ones?

Map out your course in modules
Now that you’ve determined whether it’s worth investing your time in developing a course, you can start mapping out the course.
Based on what you have to offer and what you have researched, assemble a list of “chapters” or course modules you can use as a structure for your course.
I made a folder per module with a word file. For every chapter, write down your first ideas, cut and paste research from online sources, quotes, things that worked for you, etc. Now you have a foundation for what could be your course!
Dive into every module topic, you can repeat the research process above to further finetune what people want to know. Use it to your advantage.
Write a coursebook
Once you’ve finished laying the foundation, it’s time to write! Write your coursebook per module. Divide it into submodules to create digestible chunks of information for your future students. Make it short, sweet, and to the point. Your students will thank you! And you need happy students to gather reviews.
For your understanding: a coursebook is a folder for your course consisting of subfolders that are your course modules. Every folder contains a word document where you write out the entire module from text to quizzes. If you have any graphs, photos or other attachments, include these in the subfolders.
Play around with graphs, charts, quotes, anything that can add an extra layer to what you want to teach. Think of assignments you can give your students for each module. Include that in your word file. Create a multiple choice quiz per module, include that too.
When you’re finished, now is a good moment to test if your coursebook resonates with people. Have someone take a look at it. What do they think?
I worked the other way around, my course started with about 20 blog posts I turned into a coursebook. But I did use the other steps to come up with the blog posts. Consider posting your course modules as blog posts on Medium or on your own blog. This way, you can get direct feedback from people willing to learn what you have to teach! In my case, readers asked me questions I could include in the course as well.
As a next step, you can consider turning your coursebook into an eBook or even paperback too. The Amazon KDP program offers a great service to realize this and immediately sell your book worldwide!
Record the course
Once you’ve settled on your coursebook and are happy with the result, it’s time to record it. Invest in a good audio recorder, you can get one under $100 via Amazon or any other retailer. I have a Zoom model.
Record in a soundproof place. I live in a city and there’ too much noise so I rented a cabin in the woods recorded the course in about half a day. This process is hilarious. I messed up a lot and struggled through sentences and cursed at myself. I had coughing fits every now and then and a very dry mouth.
It’s funny to hear that back. But you have to edit the course and cut coughs, cuss words, and other annoying habits to make it sound professional!
I used a simple audio editing software called Wavepad. I paid for a quarterly subscription and canceled it after to save costs.
I recommend to record even module entirely and then cut it into the submodules.
For example, I have a module called “writing toolbox” and divided that into three sub-modules: what’s in the writing toolbox, tools, and what type of writer are you?
Save all your files in your folders.
Last, you need to mix the edited files. I used Auphonic for this. You can mix and master the sound files for free (maximum of 2 hours per month).
Develop slides
You’ve come a long way, but there’s more work to be done! To accompany your audio, you need visuals. Most teachers use slides.
Develop slides to accompany your audio based on the texts in your coursebook. Do this for every submodule. I used Keynote for this. Make an introductory slide and be as creative as you deem fit. Here you can use your graphs and images you saved as well. What matters most is that it is of substance!
Make sure that you select the widescreen optionality in developing the slides. That way your course covers the full screen of the video. I forgot about this and had to alter ALL modules.
Match audio and slides
You’re almost there! Now you have to glue the audio and slides together. There are probably more sophisticated ways to do this, but I always prefer the lean and mean approach.
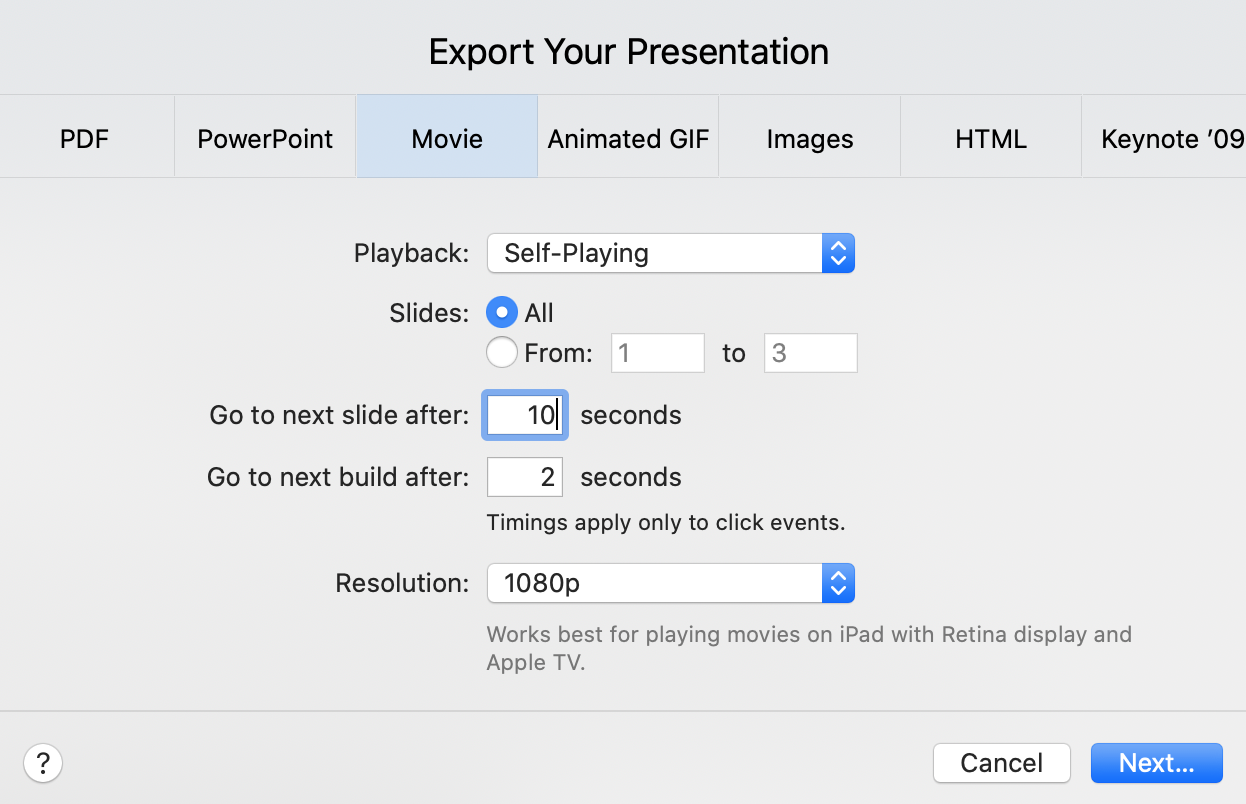
You can export your keynote slides as a movie. Select 10 seconds as per the screenshot above and make sure you select the highest resolution (1080p).
Open iMovie (or a Windows equivalent, sorry guys I’m an Apple geek, but I’m sure you know what to do if you have Windows).
Per submodule, you import the movie files of your presentation and the audio file.
Now you need to match them:
Cut the movie into 10-second pieces, these are your slides.
Add a freeze frame per slide.
Extend the freeze-frame up to the point where you have to introduce the new slide matching what you’re saying.
Continue to the end of your audio.
Do a final check.
Save in HD in the appropriate folder.

If you want to invest in a nice piece of software, my friend recommends Camtasia. Many online course builders use this. I was a cheapskate… Sorry, not sorry. Do what works for you.
Create a teaser
You have to select one video to top your course. When people find your course landing page, this video will be shown. Use this to sell your course. What will people learn? What’s in it for them? What can you offer? The best part is that you can also use this as a promotion tool on your blog, social media, in your newsletter, on landing pages, etc.
There are multiple ways to create a teaser like this. You can make an animation or hire someone (through Fiverr) to do this for instance.
I filmed myself and spoke directly to the potential student. I like it when other instructors do this because it’s more personal that way.
Design a course image
Through Fiverr, I hired someone to create a cover image for my Udemy course. I literally paid $5 for this.
A good image needs to visualize what students will learn. Be creative or hire help.
You can also use stock images paid (Stocksy) and free (Unsplash).
Upload it to Udemy
Now you have all the necessary material. If you haven’t got a Udemy account yet. Make one.
Then follow their guidelines and instructions to upload the course. It’s easy-peasy.
Make sure you do a final check for all the videos and then you’re done!
Submit the course for review and fill in the necessary documents Udemy requests of you. It takes about a week to go live from here.
Develop a solid course landing page
For your Udemy course, you need a good landing page. Good copywriting is key here. Take a look at successful courses on Udemy and see how they construct their pages.
Use the AIDA principle: grab potential students’ Attention first, spark their Interest, create a sense of Desire (to a point that it’d be a waste for them to miss out), and end with a paragraph that results in them taking Action and buy your course.
The most important question you need to answer is: why should they buy your course?
What’s in it for them? What pain can you alleviate? Ok, well that’s three questions, but you get the idea I hope!
Promote
Use that week to make a promotion plan! I developed a plan through four phases.
Phase 1: build-up
In this phase, reach out to your audience (if you have one) and start giving away your course for free. Ask for a review in return. People are usually happy to do this. Invite your spouse, friends and family members.
In this phase, it’s important to build rapport. That means getting as many students and reviews as possible.
Use social media channels at your disposal. Post the course in discussion boards, Facebook groups, etc.
Make sure you take part in Udemy’s marketing program. That way, they promote your course and take a cut. Your course will be heavily discounted, but the courses you sell through this channel would have otherwise not been sold.
Phase 2: soft launch
I decided to promote the course for free in a short story writing Facebook group I host. After a week or so the first reviews came in. Then I send a discounted coupon to my newsletter subscribers. Sales started to come in!
In the meantime, the Udemy marketing services started kicking in too.
Phase 3: hard sales
If you have a blog promote your course on it. In addition, if you have any well-visited posts, place a banner for your course in the text.
I have about ten posts that have many visits per day because they rank high in Google. In addition, these posts are related to the short story writing course. So the visitors they attract is the right target audience.
Look at your network. Is there anyone you can cooperate with? Anyone with an audience that might be interested in your course? Approach them. You can also offer them a piece of the pie and work with affiliate links.
You can consider hosting a webinar connected to your course material and sell the course at a discount at the end.
You can write more blog posts related to your course and pitch the course with a link.
Create a sales page for your course you can refer to at one point in your marketing funnel.
If you have a budget, try targeted ads via Facebook or Instagram. Use your course teaser for this.
If you have an eBook connected to the course, update it with a link to your course!
Phase 4: perpetual promo
Rinse and repeat the steps from phase 3. Try to collaborate with other bloggers in a similar field to yours.
Reach out to more people. Write smart SEO articles that add value and perspective to course-related topics. Include a banner for your course.

Like this ;-)
Consistently promote your course. Refer to it in new products and articles you develop.
Conclusion
There you have it! These are all the steps you need to take to create and publish a course from scratch on Udemy. It’s a lot of work and you need to take a lot of steps but they are easy.
The software that you necessary isn’t hard to use, and you don’t need to invest more than $100. The only thing you invest is your time. It’s a worthwhile investment for something that may bring in money every month!